
Some basic blaster paint tips
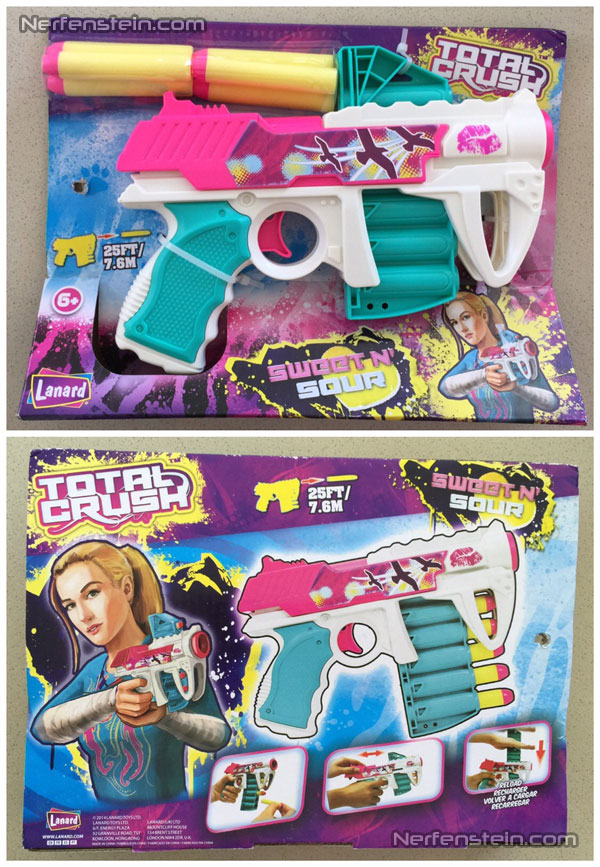
Thought I’d throw together a little article about the different ways you can mod a simple Nerf / Toy blaster with just paint or tiny tweaks. I found this really lovely blaster design in a toy store, I’d never seen it before and though I figured the range would be terrible, I nabbed one. Looks like a ripoff of the Nerf Rebelle series of blasters, but some of them actually better designed (in my non important opinion).
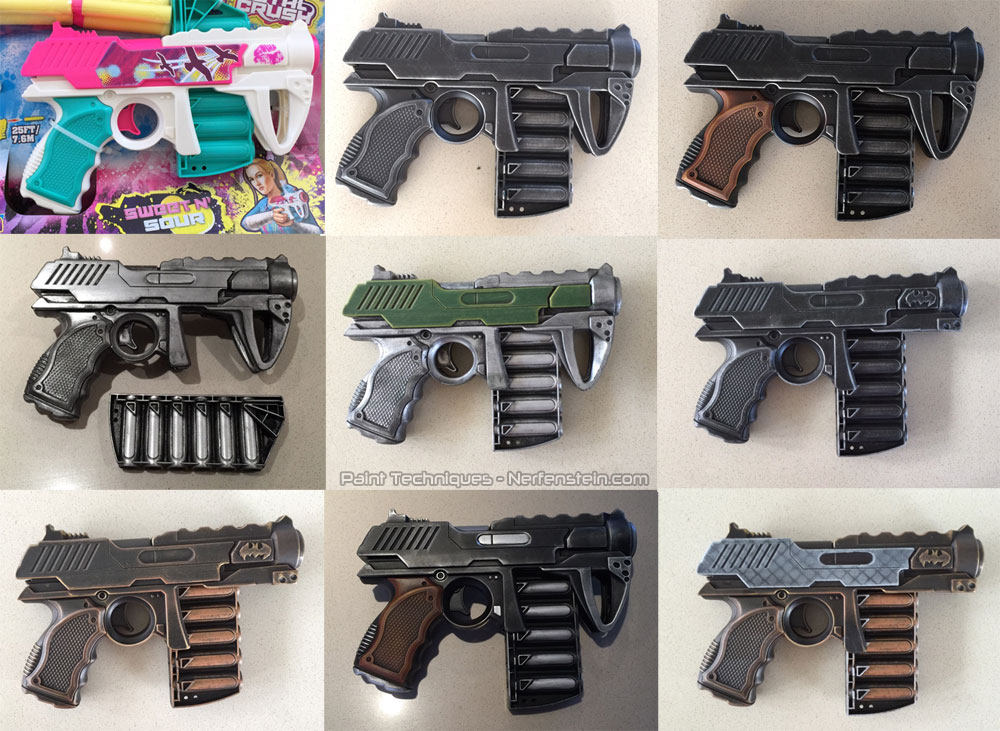
The blaster I’m using for this little experiment is called the Sweet ‘n’ Sour and is part of the “Total Crush” range by Lanard. Sadly – as expected – the ranges were pretty dire, but that sweet sweet design! The Lanard Shell Shock is one of my favorite blaster designs of all toy blasters, I’ve modded a multitude of them in the past and I guess this is sort of a feminized version of that… ugh. Still… gender politics aside… nice design.
Let’s look at how you can get different looks when modding a Nerf or other toy blaster with mainly just paint effects.
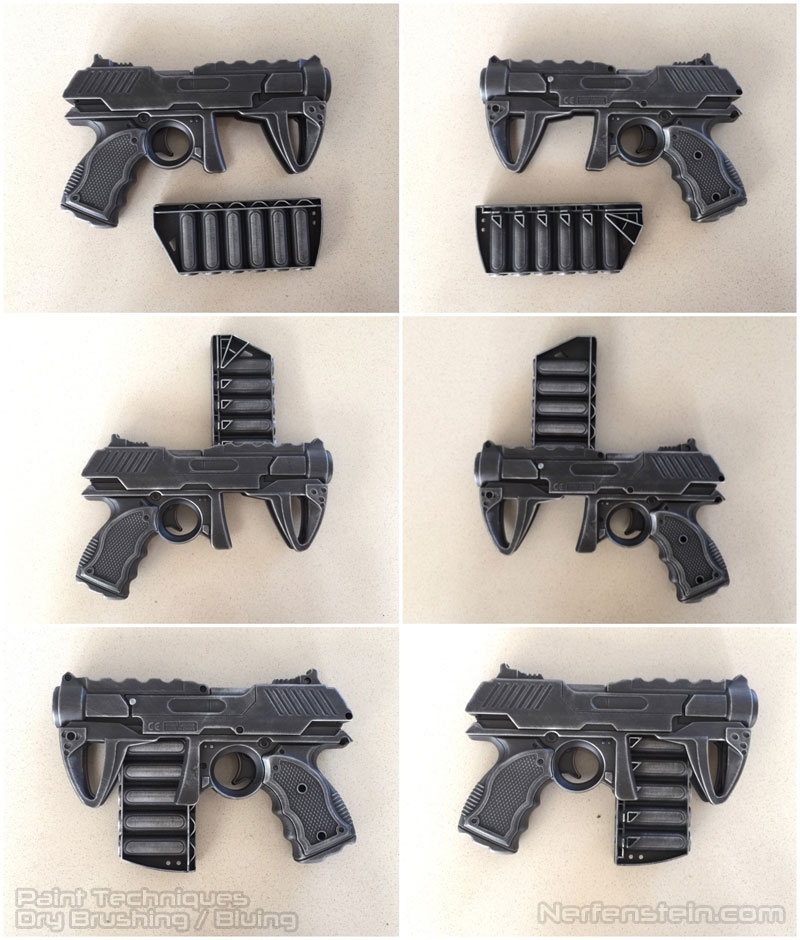
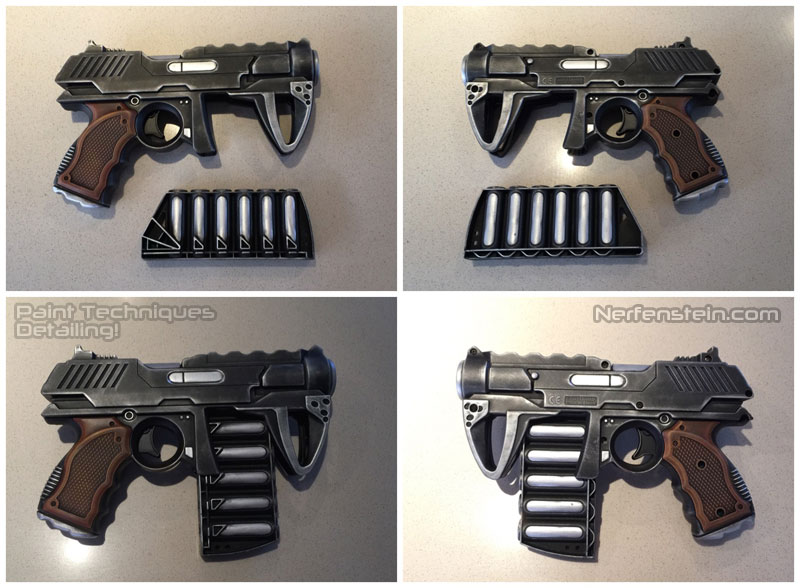
DRY BRUSHING!
Yes, yes, it’s my favorite thing to do, because I’m old and I used to paint tabletop RPG miniatures… a lot. Who doesn’t love a nice dry brushed Beholder, Paladin.. or indeed Cthulhu Adventurer or Space ‘Traveller’! Carry that over to big things like toy blasters such as Nerf and you’re on a winner! This first technique is simple, black base, dry brush silver metallic over it… done! It’s the toy blaster equivalent of bluing your firearm. The big trick is in the name DRY brush. I often see people who have dry brushed when clearly they’ve WET brushed. For a lovely neat finish you want hardly any silver on your brush and multiple (MULTIPLE) passes ACROSS the indented areas. Here’s the result of doing only that:
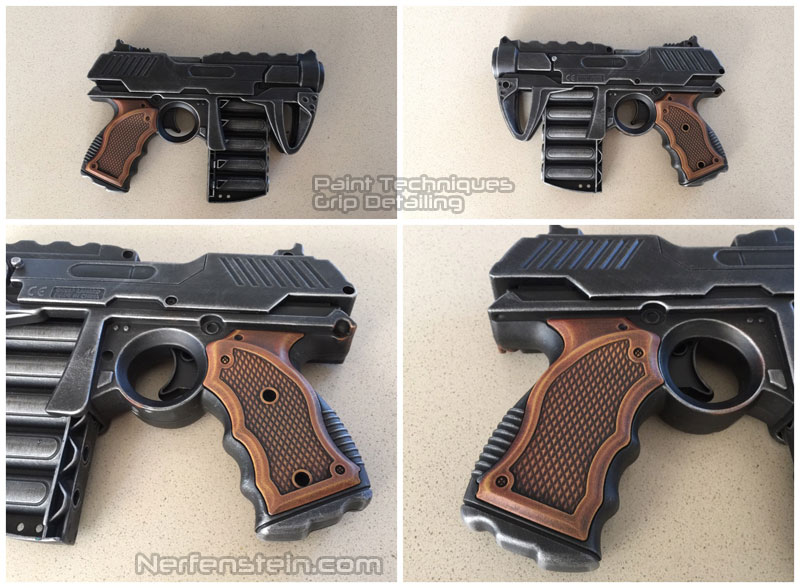
GRIP DETAIL
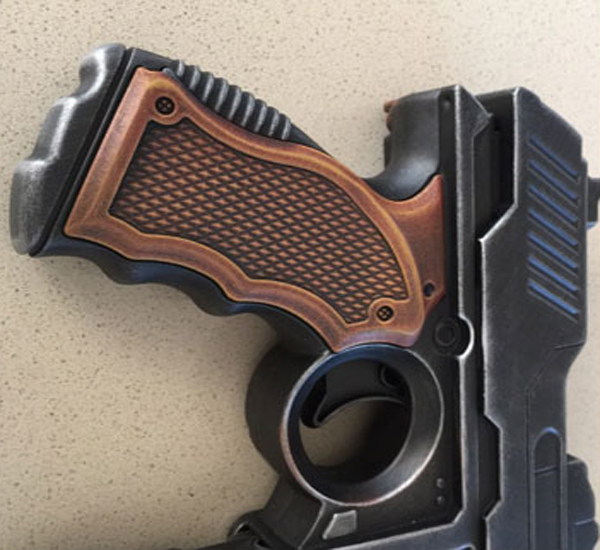
Want to knock your toy blaster up to the next level? GRIP DETAIL! The grip is – usually – a great piece of detailing on most toy guns / Nerf etc. This Lanard Total Crush Sweet ‘n’ Sour (UGH!) blaster has a really lovely grip detail, so bring it out! I went with a wooden style, dry brushing (THERE IT IS AGAIN!) three browns over it, starting with the darkest and working up to the lightest (a tan color). It’s a great effect, give it a try!
PARTS DETAILING
As well as the grip there will be other parts of your blaster that you can detail. Make the most of this, so it’s not one big flat landscape, but remember… sometimes less is more, don’t overdo it. I just chose to paint in the indiviual ammo ports and the shell eject area, also dry brushed in that drop down front a little heavier.
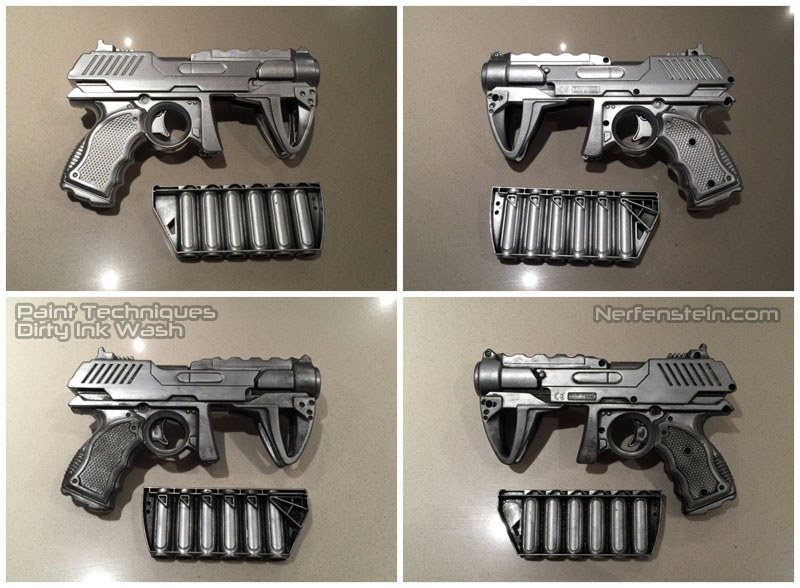
DIRTY INK WASH! – WHAT?!
This is basically the opposite of the bluing / dry brushing paint technique, it’s messy, but if you’re looking for some post apocalyptic paint techniques, look no further. When the world ends, when civilizations crumble things aren’t clean and neat anymore, they’re messy and dirty. This technique is simple, reverse the dry brushing technique. Spray your blaster metallic (silver, chrome whatever your preference is). When it dries, brush black ink (thin black paint will do!) all over it, making sure you get into all the crevasses, wait 30 seconds and wipe it all off WITHOUT going into the crevasses. Wait a few minutes and repeat the process a couple more times. Dirty ink wash complete!
DIRTY INK WASH and PANEL HIGHLIGHT
Changing just one section of paneling, or a slide or whatever other singular aspect of your Nerf / Toy Blaster can change the overall appearance. Here’s just a quick green with green / yellow dry brush… you’re seeing a pattern here aren’t you.
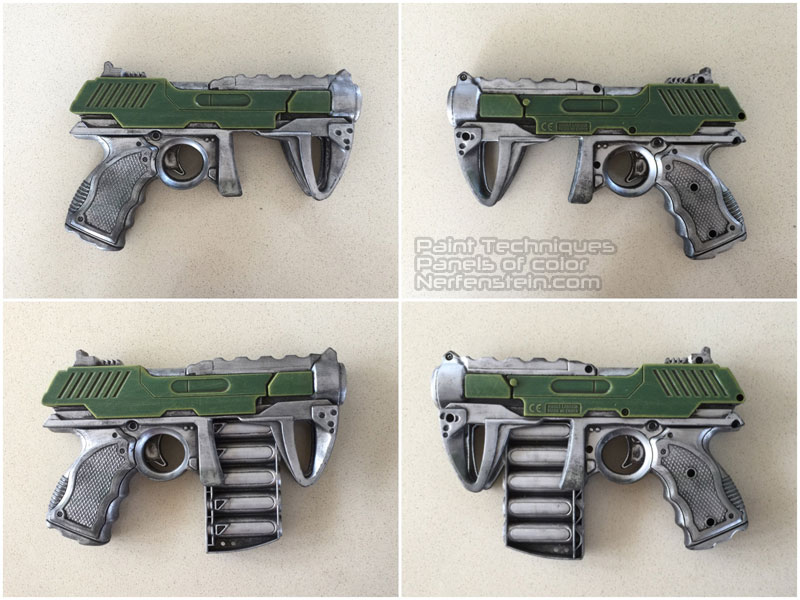
REMOVING AND ADDING GUFF
A quick chop here, a bit of glue there. That curved bit at the front, chop! Sawed it off. Added some lame Batman logos. This was just to show how small and simple additions and subtractions can change the overall look.
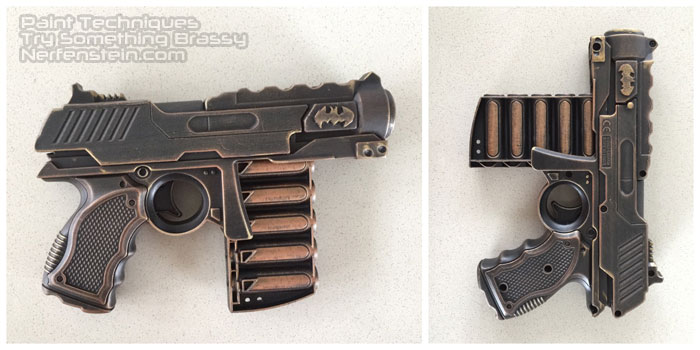
BRASSY METALLIC MORE THAN STEAMPUNK
There’s a misconception in modding that painting something brassy / copper tones immediately makes it steampunk, not so. Steampunk as a sub-genre is inspired by the great age of steam, the late Victorian era. Though brass plays a role, it is not in and of itself steampunk. So keep that in mind when painting your blasters, don’t always go straight to the leaden / silver tones.
PATTERNS!
Last up for this Nerf / Toy Blaster Modding techniques post (because it could go on and on and on), we’ve got patterns! You might think you need some fancy stencil making knowledge to get cool patterns on your blasters, not so! Take a look around and you will see a multitude of things you can use, from simple paper cutouts, to mesh bags, drawer inserts (the one with loads of holes) and in this case, some plastic guttering protect. Simply pull your pattern tight around the area you want the pattern on and spray ALL IN THE ONE DIRECTION, don’t move around to much, you want the stream to hit straight on and you’ll get something like this.
And that my lovely Nerf / Toy blaster modding pals is that! I hope you’ve found something in this post useful, I tried to cover the gamut of the main painting techniques, but as always I’m over at my Facebook page and do respond to the comments here if there’s anything left unclear.
Till next time people… what do we say?! ….
DO GOOD THINGS!
———==oOo==———
Originally written for GirlyGamer.com.au home blog of Nerfenstein / GirlyGamer / BoardGameGran. Catch up with me on my Facebook page, or if you Tweet… there’s always Twitter and guess what, I actually reply!
Great tutorial, thanks for posting it.
You are more than welcome Tazok, I hope it’s of help to you 🙂
Great stuff and thanks for sharing. Been admiring your work for some time.
Could I ask what paints you use for the silver dry brush (over black basecoat) and the silver base coat before the ink wash?
And the paints used for the wood grip detailing?
I’m wanting to have a go at this but can’t get source the particular paints mentioned on US sites (I am in Australia also).
Thanks 🙂
Hi Mitchell,
I actually have a full painting guide right here on my site (type on beginners and you’ll see a Nerf painting guide). It lists Australian stuff. In short though: When going cheap I use Aussie Export for rattle can spraying, Rustoleum or other more expensive brands if needing a specific color not available in the cheaper brand. Dry brushing is always acrylics and I use everything from Games Workshop to hobby paints (usually the former, though they are ridiculously expensive).
I hope that helps
🙂