Mav2D2 the R2D2 Nerf Maverick Mod
Featured Nerf Mod Tutorial: The Mav2D2 Nerf Maverick R2D2 mod Star Wars is an oldie, but a goodie, so I’m including it as a featured mod in my website overhaul… here’s the original tutorial post (Sept 9, 2011) – I’ve just finished my Mav2D2 Nerf mod (yes another Nerf gun I have given a name and personality lol). This is the first Nerf Maverick I’ve modded and it spoke to me a couple of weeks ago when I flipped it on end one night. It said “Help me GirlyGamer, you’re my only hope”. R2D2 was right there in the Nerf Maverick and to be honest I am just stunned no one else has done this before, but an extensive web-search suggested not… woohoo another wacky original idea!
When I decided to start Nerf Maverick R2D2 I had 3 guns on the go (Nerf Recon, Buzz Bee Double Shot – the Zombie mod and the Buzz Bee Rapid Fire), but Mav2D2 had swayed me away! This is a run through of all the faffing involved in the Nerf mod. Remember I’ve only been Nerf paint modding for about 4 weeks, so I’m a beginner and this tutorial is from me as a beginner to whoever needs it. I’d love to try another Maverick some time in the future, maybe add some wheels and symmetry! For now though here’s the tutorial on the R2D2 Nerf Maverick mod, I’ve called ‘him’ Mav2D2.
Mav2D2 Nerf Maverick R2D2 mod tutorial – Sanding
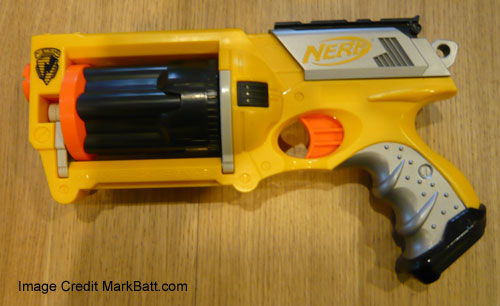
First up get your Nerf Maverick, remove the slide (3 simple screws) and take apart if you wish (don’t lose the pieces and if taking the entire Nerf Maverick apart, I suggest taking photos so you can see exactly where every piece went when you go to reassemble). I just removed the slide as I wasn’t doing any internal modifications.
Sand the Nerf Maverick down as you always do before you start painting a Nerf / Buzz Bee weapon. Once completely sanded, grab a hacksaw and saw off the sight on what will be Mav2D2’s right leg. This will probably leave a tiny hole along it, don’t worry, a couple of layers of paint and that will be filled in. Re-sand to make sure it’s smooth. Now hacksaw off the end of the barrel exit, not the whole thing (though I guess you can if you like), I just did to where it butts against the secondary section, rather than the actual flat as I thought it would look better, totally up to you though. Again re-sand this area. Once you’re happy with all your sanding, clean it all to remove residue and let dry. Finally you’ll need to find something you can use for the little projector tube on R2’s dome area. I used the closing cap off some hair removing cream… yeah weird, but who cares, it did the job. I just cut it with a modelling knife until it was roughly the right shape and glued it on in the right position, this was great because I even managed to fit it with a lens as you’ll see later in this tutorial.
Mav2D2 Nerf Maverick r2D2 mod tutorial – Base Painting
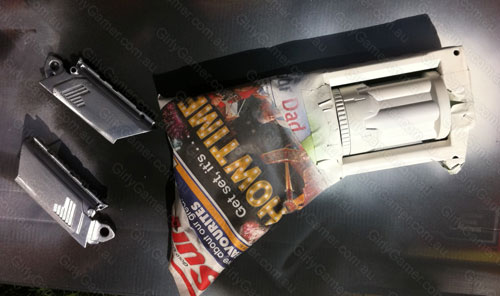
I started off with a base of white, thinking this was a good idea because R2D2 is white…. WRONG! Base of black is always best, I should have known.. beginners error! Spray a light even black matte base coat a few times on all pieces, including the slide. Needless to say let it dry between coats. Looks pretty cool all black doesn’t it? Time for some taping! Get your masking tape and tape off everything above the top of Mav2D2’s legs, including the dome! Do this all the way around so you’re essentially left with just the legs and cylinder uncovered, spray flat white (again a good couple of coats in all the nooks and crannies). Top hint.. keep the legs taped straight and even on both sides at the top, this will give you a nice clean line when you remove the tape. I also sprayed the slide in aluminum, but changed my mind later when I realized this detracted from Mav2D2’s dome. I’d suggest keeping them the base black and you can detail them with silver later.
Mav2D2 Nerf Maverick R2D2 mod tutorial – R2D2 Dome Painting
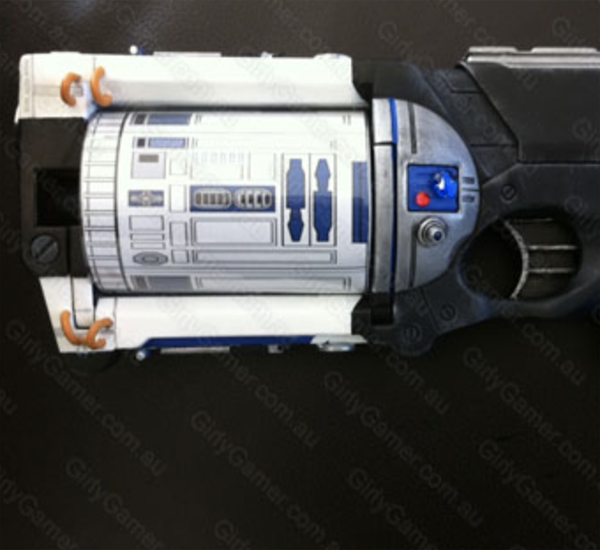
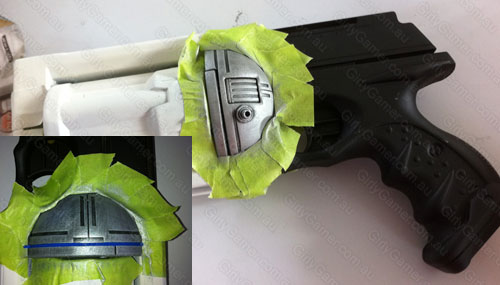
Once the white had dried and you’ve uncovered the whole thing, time for more taping. This will really bring out Nerf R2D2, sorry Mav2D2 in all his glory. Once you see this little bit finished you’ll just smile! Right, Tape off ALL around the dome area on both sides, remember he has a back too! Time for some silver drybrushing! Simply dry-brush the dome on both sides in silver, this will give some cool detail! Add the bright blue line detail on the lip area where the cylinder ejects and to the same line that’s scored in on the back dome area. Now you see R2D2 don’t you?!
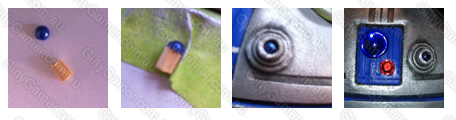
Next up some fiddly bits. Use the same blue color for the cylinder eject button. While that’s drying, time to work on R2D2’s projector / lenses. I had bought a little bag of sticky half shiny plastic beads in the craft shop, I took one and glued it to the top of a tiny cutting of a wooden skewer I had in the kitchen (because handily this fit perfectly into the cap I was using for the projector. I also bought two bags of half glass beads in various sizes, one red and one blue. I stuck these on the cylinder release button once I worked out the right sizes (big blue, small red). Hard to explain so I took pictures! This just added a tiny bit of detail and looks cool because they ‘shine’.
Mav2D2 Nerf Maverick R2D2 mod tutorial – R2D2 leg wires
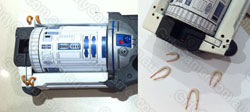
Okay I’m not an R2D2 specialist, but he has wires near his ‘feet’. It’s not R2D2 without them, so I decided to add them.
I bought wire that looked about the right thickness (from the hardware store), cut into 4 pieces, stripped the ends of the 4 pieces I’d cut to size. Next up I drilled the four holes in the places I thought they looked like they would go, just to the width of the wire, not the wires and covering (but this is up to you). Slotted them in and glued them in place. Then just painted them the color they looked like they should be. R2D2 leg wires done!
Mav2D2 Nerf Maverick R2D2 mod tutorial – Nerf Maverick hand grip
Time for the all important grip. This is totally up to you, but I went with shades of blue because I thought it fit the R2D2 theme.
It looks kind of purply in the photo, not sure why, this is essentially a base layer of dark blue, with two lighter blues dry-brushed over the top, to bring out the grip detailing.
I also added a dry-brushed blue to the section on the butt because the original metal dry -brush of the entire butt didn’t look as cool. This breaks up the butt sections nicely though (yes that somehow sounds rude).
As you might be able to tell, I also dry-brushed the rest of the edges on the gun in grey to bring out detail… this was a VERY light dry-brush.
Mav2D2 Nerf Maverick R2D2 mod tutorial – Nerf Maverick R2D2 legs
More fiddly bits, but you’re nearly done! Time for R2D2’a legs. Once again I’m not an R2D2 specialist, this is just an aesthetic mod made to look similar, it’s not meant to be technically correct! If you want it to be technically correct, good luck finding those materials to hand.
Right I had a few bits I used here. My handy kitchen skewers cut to two sizes and sprayed silver, Some bits I bought in the model store (RC car gears bits and hinges), these too were sprayed silver. You don’t need to find these exact bits, just go for whatever you like. I taped around the two small silver skewers to make those little bits R2D2 has near his feet. I painted the tape the same blue I’d used throughout. I then laid these pieces out to make sure they would fit both sides. I added in more RC car parts shaved flat and left black. These were all glued onto both sides of the Nerf Maverick. Problem here is both sides are different widths / shapes, I figured so long as the additional pieces were added symmetrically / at the same height positioning, that’s all I could do as a beginner. I’m sure for those who are Dremel crazy with loads of Nerf Maverick pieces laying around and a hot glue gun, you could make it perfectly symmetrical. Oh and add those wheels I wish I had the talent to. Once you’ve added in the new pieces and touched up any painting mishaps, added in a little detail, it’s time for the R2D2 body wrap. This was merely an image I photoshopped to size, printed out and wrapped with some clear plastic. DONE!
Again I’m sure the modelling people out there who are not new to Nerf Modding like me could somehow fill in the cylinder and sand it perfect flat and paint on the body section, or even better actually make the body section as R2D2 actually looks! That would be awesome and so long as the cylinder still turns and the gun still works, you’re all good!
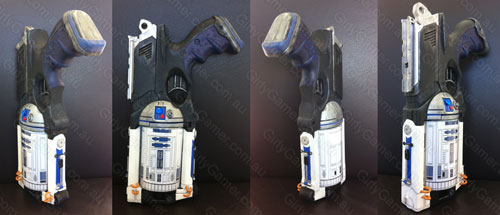
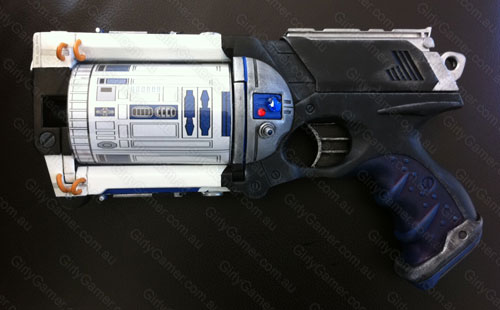
Mav2D2 Nerf Maverick R2D2 mod tutorial – Nerf Maverick R2D2 finished!
Just a couple of pictures of the finished product. This is yet to be clear coated. I’m still trying to find an Australian make that sprays clear matte as opposed to making everything look glossy, wet or shiny. Needless to say this Nerf Maverick still works just as it did before I started.
I hope you’ve found this Nerf Maverick mod post to turn your Nerf Maverick into an R2D2, or rather Mav2D2 of use! I also hope anyone using this or copying this idea will give credit / link back as a courtesy, I know that’s not generally the online way, but it would be cool 🙂
Join me on Facebook – Nerfenstein
Holy shit, I had to do a double take.
Now when I look at my Maverick I I can see is R2 D2 looking back at me.
In all my years as a Nerf fan I’ve never seen this idea.
Brilliant.
Girly that is great. Also cool you shared with everyone else how to do it. A lot of nerf mod people keep all their little modding secrets close to their chest, I hate that. This is making me tempted to try this with my maverick, If I do I’ll come back and let you know.
Me again, what was the cap thing for the projector? It looks small when I’m looking at my Maverick, caps are usually pretty big and they don’t have holes in them.
That is sick!
Nice looking blog btw, like the theme.
those bead bits look like they are lit up O_o
That looks awsome. Glad you entered it in clunks comp. You should start painting commision a if you really enjoy it. You certainly have the tallent.
Hi guys,
just wanted to say thank you for all the positivity! The internet isn’t known for this, so you guys rock!
@Johnboi
The cream I am referring to is a pump and there is a little clip on the end that pushes into where the cream comes out, just snip that off. It’s not a cap like a toothpaste cap. Hope that helps!
Saw this on a nerf forum I am on. Great job, especially for a beginner. I also like the Blade Runner one you did. Look fwd to what you come up with next. Will be hard to top this I imagine.
Luv it, nuff said. Actually no, I like the name Mav2D2 also.
[…] gun Geek Stuff 21st September 2011 – By Andrew TweetHere’s a site to watch – GirlyGamer.com.au. Why? Imagine not just a girly gamer – but a blogger who can design her own Star Wars […]
Saw this on deviantart, what a blast.as soon as you put the silver or metal looking paint on it it looked like r2d2.
[…] […]
When you say ‘dry brush’ what does that mean. I looked it up but still don’t get it. I would like to give it a try. Also do you need to sand it, can I just paint on the maverick without doing all that?
Hi Applegod, dry brushing is just a painting technique. It’s covered a little HERE. I would recommend sanding, unless you’re using a special paint, like vinyl dye. Hope that helps. I’m not a specialist though ;p
[…] out Girly Gamer’s website for a “run through of all the faffing involved in the NERF mod.” Heh. She said faffing. […]
[…] out Girly Gamer’s website for a “run through of all the faffing involved in the NERF mod.” Heh. She said faffing. Sorry. […]
[…] moment bricolage pour les fans de Star Wars qui aiment le montrer. Tout un tutoriel qui explique comment passer d’un Nerf tout simple (image en bas) à un Nerf R2D2 nommé Nerf […]
I io9.com tipped this, but as usual all they’re interested in posting since the revamp is pretentious shit their own writers like, as opposed to what actual science-fiction geeks might like.
This is iconic nerf shit right here.
#WIN
[…] The unique aspect of Nerfenstein mods is that while most of her work pays homage to games and movies, there’s an occasional example of objet d’art thrown in as well. Most other aesthetic mods I’ve seen try to make NERF blasters look like realistic modern day fireams or straight-up sci-fi props, but there’s a humour present in Nerfensteins designs that’s missing elsewhere. Take for example the Nerfenstein “Mav2D2″ Star Wars themed Maverick: […]
This is Amazing! I stumbled on to this post from google images and i’m sooo glad i did. You rock.
Simply amazing!! Two thumbs up!!
You are very kind, thank you Thomas.